HA-Proxy
SW loadbalancer로 제일 많이 사용하는 것 중에 한가지가 nginx나 haproxy 일것이다. http/s 위주의 서비스라면 nginx로 충분하겠지만, 범용으로 tcp/udp 서비스를 위한 Load Balancer 로 사용할려면 ha-proxy 를 사용하는 것이 좋다. 또는 envoy나 traefik 등을 사용할 수 있다.
| subject | http | https |
|---|---|---|
| Latency (HTTP) |  | 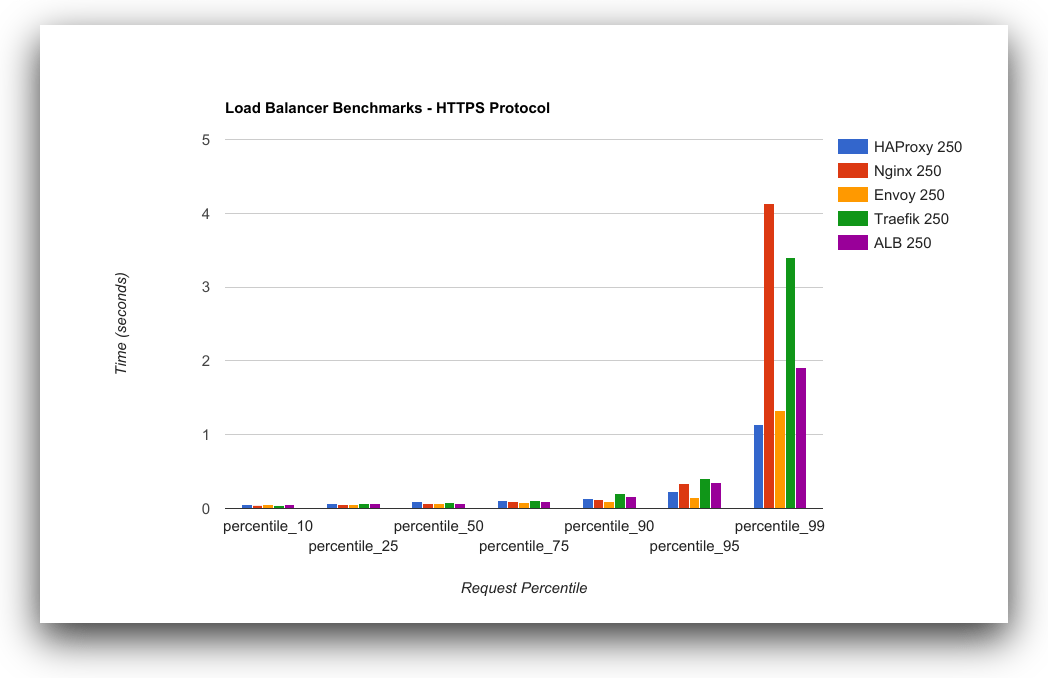 |
| Requests/Second | 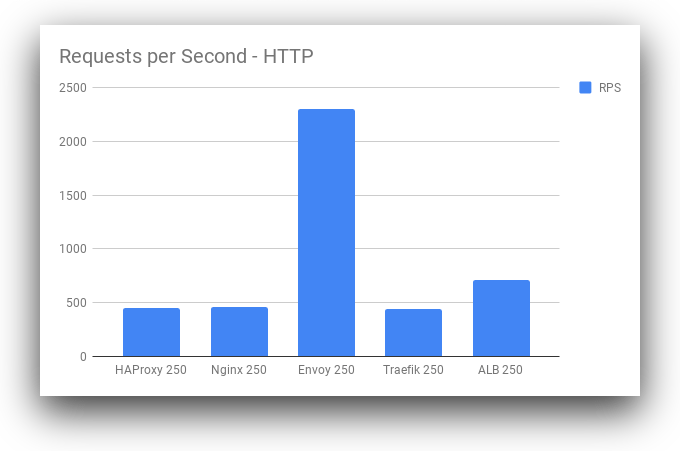 | 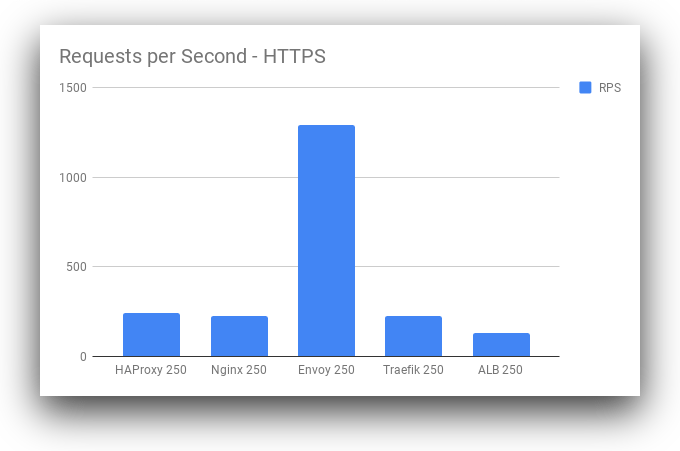 |
위의 Benchmark 자료를 보면 알 수 있듯이, envoy나 traefik이 요즘 유행하고 있지만, 역시 구관이 명관이다.
설정 reload
haproxy.cfg
- /etc/haproxy/haproxy.cfg 에 haproxy 설정을 추가하고 변경된 설정을 적용하기 위해서 haproxy reload 를 해줘야 하는데, 설정이 자주 변경될 때 매번 haproxy 서버에 접속해서 haproxy.cfg 를 변경하고 haproxy 서버를 재 설정해 줘야 한다.
cat > /etc/haproxy/haproxy.cfg <<EOF
global
  master-worker
  log stdout format raw local0 info

  stats socket /run/haproxy.sock user haproxy group haproxy mode 660 level admin expose-fd listeners
  stats timeout 30s

  chroot /var/lib/haproxy
  user haproxy
  group haproxy

  # Default SSL material locations
  ca-base /etc/ssl/certs
  crt-base /etc/ssl/private

  # Default ciphers to use on SSL-enabled listening sockets.
  # For more information, see ciphers(1SSL). This list is from:
  #  https://hynek.me/articles/hardening-your-web-servers-ssl-ciphers/
  # An alternative list with additional directives can be obtained from
  #  https://mozilla.github.io/server-side-tls/ssl-config-generator/?server=haproxy
  ssl-default-bind-options no-sslv3
  ssl-default-bind-ciphers ECDH+AESGCM:DH+AESGCM:ECDH+AES256:DH+AES256:ECDH+AES128:DH+AES:RSA+AESGCM:RSA+AES:!aNULL:!MD5:!DSS

defaults
  mode tcp
  maxconn 4000
  log global
  option tcplog
  option dontlognull
  option tcp-smart-accept
  timeout check 5s
  timeout connect 9s
  timeout client 10s
  timeout queue 5m
  timeout server 10s
  timeout tunnel 1h
  timeout client-fin 10s

userlist controller
  user client insecure-password cert
EOF

systemctl enable haproxy.service
systemctl start haproxy.service
dataplane api
- haproxy enterprise 를 사용하면 haproxy-dataplane-api 패키지를 바로 사용할 수 있지만, 사용하기 위해서는 haproxy-key 가 필요하다.
- 하지만, oss버전의 dataplane-api 를 github에서 다운로드하여 사용할 수 있다.
curl -Lk https://github.com/haproxytech/dataplaneapi/releases/download/v2.0.3/dataplaneapi_2.0.3_Linux_x86_64.tar.gz --output dataplaneapi_2.0.3_Linux_x86_64.tar.gz

# $PATH 경로에 바이너리를 추가한다

# 방화벽이 있는경우
iptables -A INPUT -p tcp --dport 5555 -m conntrack --ctstate NEW,ESTATBLISHED -j ACCEPT

# Data Plane API 시작(예)
./dataplaneapi --port 5555 -b /usr/sbin/haproxy -c /etc/haproxy/haproxy.cfg -d 5 -r "service haproxy reload" -s "service haproxy restart" -u dataplaneapi -t /tmp/haproxy

또는

cat /etc/haproxy/haproxy.cfg <<EOF
program api
  command dataplaneapi --scheme=https --haproxy-bin=/usr/sbin/haproxy --config-file=/etc/haproxy/haproxy.cfg --reload-cmd="/usr/bin/systemctl reload haproxy" --reload-delay=5 --tls-host=0.0.0.0 --tls-port=5555 --tls-ca=/etc/haproxy/ca.crt --tls-certificate=/etc/haproxy/server.crt --tls-key=/etc/haproxy/server.key --userlist=controller
  no option start-on-reload
EOF


# validate
curl -u <user>:<pass> -H "Content-Type: application/json" "http://127.0.0.1:5555/v2/"
Kubernetes SIG / Service-API
쿠버네티스의 서비스 관련 API CRD로 Gateway API (LoadBalancer API)를 사용할 수 있다
# git clone
git clone https://github.com/kubernetes-sigs/service-apis


kustomize build https://github.com/kubernetes-sigs/service-apis/config/crd | kubectl apply -f -

Build the Load Balanacer API controller manager image:
make docker-build


Load the Load Balancer API controller manager image into the Kind cluster:
kind load docker-image load-balancer-api-controller:dev


# Load Balancer API 배포
kustomize build https://github.com/kubernetes/service-apis/config/default | kubectl apply -f -


Create a cluster-scoped GatewayClass resource that configures access to the HAProxy DataPlane API server:
cat <<EOF | kubectl apply -f -
apiVersion: networking.x-k8s.io/v1alpha1
kind: GatewayClass
metadata:
  name: haproxy-lb
spec:
  controller: lbapi.run.tanzu.vmware.com/haproxy
  parameters:
    group: v1
    resource: Secret
    name: haproxy-lb-config
EOF


Create the Secret resource that contains the information used to access the DataPlane API server:
cat <<EOF | kubectl apply -f -
apiVersion: v1
kind: Secret
metadata:
  name: haproxy-lb-config
  namespace: default
stringData:
  value: |
    debug: true
    servers:
    - https://172.17.0.2:5556/v2
    serverName: dataplane-api
    certificateAuthorityData: "$({ base64 -w0 2>/dev/null || base64; } <hack/images/haproxy/example/ca.crt)"
    clientCertificateData: "$({ base64 -w0 2>/dev/null || base64; } <hack/images/haproxy/example/client.crt)"
    clientKeyData: "$({ base64 -w0 2>/dev/null || base64; } <hack/images/haproxy/example/client.key)"
EOF


Create a selectorless Service resource that indicates port 80 should be forwarded to port 8080, the port on which the web server is running:
cat <<EOF | kubectl apply -f -
apiVersion: v1
kind: Service
metadata:
  name: httpd
  namespace: default
  labels:
    service.route.lbapi.run.tanzu.vmware.com/type: direct
    service.route.lbapi.run.tanzu.vmware.com/gateway-name: httpd
    service.route.lbapi.run.tanzu.vmware.com/gateway-namespace: default
  annotations:
    lbapi.run.tanzu.vmware.com/ip-address: 172.17.200.2
spec:
  ports:
  - name: http
    port: 80
    targetPort: 8080
EOF
Please note the annotation lbapi.run.tanzu.vmware.com/ip-address is used to define the virtual IP address. The Load Balancer API does not yet include support for IPAM, so the virtual IP to use must be provided. This IP address must be in the range supported by the load balancer.


Create the Endpoints resource that contains the IP address of the web server:
cat <<EOF | kubectl apply -f -
apiVersion: v1
kind: Endpoints
metadata:
  name: httpd
  namespace: default
subsets:
- addresses:
  - ip: 172.17.0.3
  ports:
  - name: http
    port: 8080
EOF


At this point, if everything has completed successfully, the environment is set up and ready to provision a load balanced IP address to the Service. Verify the Service does not currently have a load balanced IP address before proceeding:
kubectl get service httpd -ojsonpath='{.status.loadBalancer.ingress[0].ip}'
The above command should not result in any output. For the time being, print the Service resource's cluster IP address:
kubectl get service httpd -ojsonpath='{.spec.clusterIP}' && echo


Because the service's cluster IP is not visible outside the cluster, attempting to access the web server via the cluster IP will timeout:
$ docker run --rm photon curl -sSm 1 http://10.96.63.24
curl: (28) Connection timed out after 1000 milliseconds


To be accessed from outside the cluster the service needs a load balanced IP address, and one will be provisioned after the following Gateway resource is created:
cat <<EOF | kubectl apply -f -
apiVersion: networking.x-k8s.io/v1alpha1
kind: Gateway
metadata:
  name: httpd
  namespace: default
spec:
  class: haproxy-lb
  listeners:
  - name: ignored
  routes:
    namespaceSelector: {}
    routeSelector:
      matchLabels:
        service.route.lbapi.run.tanzu.vmware.com/type: direct
        service.route.lbapi.run.tanzu.vmware.com/gateway-name: httpd
        service.route.lbapi.run.tanzu.vmware.com/gateway-namespace: default
EOF


The Load Balancer API's HAProxy controller will see the above Gateway resource and reconcile it onto the HAProxy load balancer. Use the following command to watch the Service resource until it has a load balanced IP address:
kubectl get service httpd -ojsonpath='{.status.loadBalancer.ingress[0].ip}' -w
172.17.200.2
The command should eventually returns an IP address, the load balanced address of the service. Once the IP has appeared, use the Ctrl-C key-combination to regain control of the terminal prompt.


Finally, use the load balanced IP address to access the web server:
$ docker run --rm photon curl -sSm 1 http://172.17.200.2
hello
Congratulations, HAProxy just provisioned a load balanced IP address for the Kubernetes Service resource via the Load Balancer API!


To clean up the resources started in this example, execute the following command: